

What Is Seed Germination?
It's pretty simple - as you can probably already surmise, this is simply a fancy way to say "start seeds". When we talk about germinating seeds, we're talking about getting a seed to pop a taproot and turn into a seedling. From there, the seedling turns into a full-blown plant.
There is a ton of work that goes into seed germination. Is it really even worth germinating seeds, or are you better off going with clones?
When planting from seed, you are able to select from a wide variety of strains and genetics. Another reason some growers will choose to germinate seeds instead of cloning is that a seedling will generally yield weight more than a cloned plant.
Today we are going to teach you how to germinate seeds quickly and efficiently.
First, let's cover all the reasons you should consider the seed starting instead of starting clones, along with what a seed actually needs to start popping taproots. Of course, we need to begin by asking "what is seed germination?" for those who are new.


What Are The Benefits Of Germinating Seeds?
Germinating seeds offers quite an extensive list of benefits to growers. The most obvious one is the availability of a wide range of strains. When it comes to buying seeds, you can purchase from either an online or in-person seed bank. Whichever you go with, you'll be astounded at the diversity you have at your fingertips.

Plus, you can buy a bunch of different seeds and store them for a prolonged period of time. With clones, you have to get them rooted as soon as you take them for the most part.
Furthermore, seeds yield more than clones. Because a clone is a replication of an existing plant, growers claim it doesn't have the same capability in terms of growth rate & yield potential.
So, the benefits of germinating seeds can be summarized as diversity in strain and genetic selection, better yields, and healthier plants. However, there are some drawbacks to starting seeds too.
The Drawbacks Of Germinating Seeds
There are two main drawbacks of starting seeds over starting clones: time, difficulty, and the guessing game of wondering whether the seed is male or female.
If you choose to start seedlings over taking clones, you can expect to add at least 3 weeks to the timeline. This isn't a super quick process.
The recipe for popping seeds is simple - but getting it just right is not. Plus, not every seed you attempt to pop will be successful due to seed dormancy, even if you provide the perfect environmental conditions.
The final drawback of starting seeds is the guessing game if you didn't purchase from a reputable seed bank. You won't know if your plant is male or female until you see either flowers or pollen sacs.
Of course, buying feminized seeds from a trustworthy seed bank will prevent this issue, so it's hardly a drawback if you do things right!
What Do You Need To Germinate Seeds & Pop A Taproot?
To germinate seeds, you really need to provide just three things: moisture, warmth, and air. When a seed pops, the taproot inside of it extends out of the shell to look for moisture.
When you keep the seed moist, the taproot will grow and crack the shell, reaching into the growing medium. This taproot then starts taking root and extending other roots from its body. The result down the line is a robust, healthy root mass.
What Is The Best Way To Germinate Seeds Indoors?
There are a number of ways you can go about seed germination inside. We are going to give you three ways to start them. We'll discuss how to germinate seeds in a paper towel, along with seed germination by planting right into the soil. We'll even teach you how to germinate using more sophisticated mechanisms like a premium seed starting kit.
What is The Process of Seed Germination In Paper Towels?
In this method, you will need an absorbent kitchen paper towel. Since paper towels are so absorbent, they will hold moisture very well for your seedlings.
Soak your paper towel, and allow excess water to run off. You don't want to drown your seeds. Then, place your seeds inside, and fold the paper towel over them in half, creating a "blanket" almost. You can then place them in a windowsill or under natural light.
If you notice the paper towel starts to dry out, just reapply water. With any method of seed germination, keep your seeds warm. This is one of the three critical aspects of seed germination. You can use a seedling heat mat to accomplish this if you have no other way at home.

How long does it take to germinate seeds in paper towels?
Wondering how long it takes to germinate seeds in paper towels? This process can take up to 5-7 days depending on the plant species. Be patient and try not to disturb your seeds while they germinate.
Remember that this is not the best way to start seeds. You will have to handle the delicate seedling once the taproot sprouts, which can damage it. You should also be prepared for some of your seeds to remain dormant. Don't get discouraged - seed germination is a numbers game!
If you really can't shell out for some pots or a seed starting kit, you can get by with this method. But we don't recommend it for serious growers.
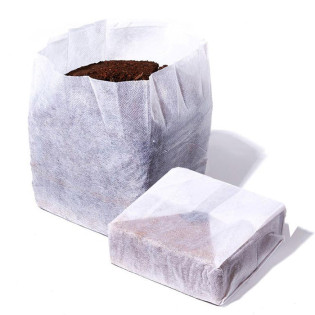
Planting seeds straight into soil or other grow medium
Now that you know how to start seeds in paper towels, let's talk about some more sophisticated, efficient methods. Some growers try and save themselves some work by planting seeds directly into a pot with soil.
This will prevent you from having to transplant them once you see the taproot pop, saving you time and the possibility of damaging the fragile taproot. Prepare your garden pots in advance. You should use small garden pots and then transplant your seedling later on.
Just like with the paper towel method, soak your soil, coco, or grow media in water beforehand. To supercharge germination, mix in some rooting hormones with the water to provide the seedling with compounds to encourage rapid rooting.
Once you have your medium pre-soaked, put some holes 5-10mm deep in preparation for your seeds. This height allows them to be close to your seedling light and encourages them to grow towards it.
Then, carefully place your seed inside and ensure it is completely covered with soil.


EcoGrow 3.50" Standard Molded Fiber Round Pot (720 per case)
Regular Price:
Special Price On sale until 04/30/2024!

How long do germinating seeds in soil take?
When germinating seeds in the soil, you should see a plant pop through the surface of the soil within two weeks. This method may take a little longer than using paper towels, but there are benefits here.
This method causes less stress to the seed, and the rootlet can start developing as soon as it emerges from the soil.
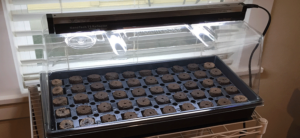
How To Germinate Seeds In A Seed Starting Kit (best approach)
If you are serious about growing, jump straight into using a complete seedling kit and starter plugs. A complete seedling kit includes:
- Seed tray with inserts
- Humidity dome
- Starter plugs
- Heat mat
- Grow light and timer (depending on your kit)
This method of germination offers you the highest success rate, with the least amount of work on your end.
Just like any other method, pre-soak your starter plugs with water and rooting hormones. These make germination easy. You can pop your seeds into them once they are soaked, put them in your tray, cover it with your dome, turn on your equipment and let them grow!
Another reason for using rooting plugs is that once the seedling becomes a small plant, you can transplant the plug and the plant directly into the new medium. This will prevent you from disturbing the delicate new roots. An alternative to starter plugs is Rockwool cubes, which work just as well.
How long do seeds take to germinate in a seed starting kit?
These kits set up the perfect conditions for germination, so it is no surprise that you will shave a few days off the process with this method. Another advantage is that the starter plugs can be transplanted right into a new grow media when the time comes.
If you are serious about growing, or just want to make things easier on yourself, use a complete seed starting kit. Our review of the best seed starter kits of the year is a great resource if you're not sure which one is right for you.

RIOCOCO PCM 4 in. x 4 in. Coco Starter Blocks - Pack of 275
Regular Price:
Special Price On sale until 04/30/2024!

RIOCOCO PCM Coco 1.25" Round Clone & Seedling Plug - Pack of 2500
Regular Price:
Special Price On sale until 04/30/2024!
How To Increase Seed Germination Rate
This can be a frustrating time period for growers, and a common reason many opt to start with clones. Nobody enjoys the waiting game. Being patient is important, but there are some ways to decrease your waiting time.
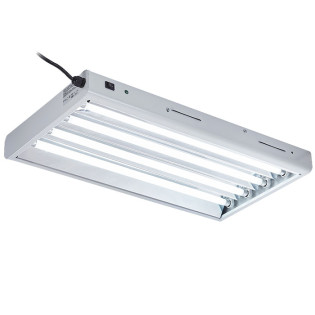
Using A Grow Light To Increase Heat & Energy
You may be asking, do seeds need light to germinate? No - not necessarily. However, providing your seeds with a high-quality seedling grow light will encourage them to root faster.
And, your seed germination rate will skyrocket when using a grow light. The seeds will absorb the light's energy, and in hopes of reaching more of it, start growing towards the light.
If you are using fluorescent grow light, you can place it close to your seeds. This will prevent them from stretching towards the grow light, which can result in them falling over.
If you are using LED, you will need to place these farther away, since they are much brighter. Powerful grow lights can burn delicate seedlings, so be careful.
You can follow a basic veg lighting schedule, 18 hours of light followed by 6 hours of darkness. A simple light timer will automate this for you so you don't have to turn them on and off manually.
If you want a recommendation, check out our review of the top T5 fluorescent grow lights of the year. These will be perfect for starting seeds indoors.
A Heat Mat Will Warm Up The Seeds
This is one of the three things important for germination, and many growers use a seedling heat mat to increase the temperature of their seeds to 75-80 degrees Fahrenheit.
This range will encourage them to sprout much faster. Using grow lights will also increase heat around your seeds.
Keep Your Seeds Moist
Since seeds don't quite have a root zone to seek out water yet, we need to make sure they can access moisture easily. This is why you need to presoak your growing medium or paper towel and keep it moist the whole time.
If you can cover your seedling tray with a humidity dome to increase the moisture of your seeds. You should shoot for humidity levels of up to 75%.
For measuring and maintaining temperature and humidity, use a hygrometer. Be sure you aren't doing the opposite extreme - drowning your seeds. This will prevent them from ever popping.


What To Do After The First Sign Of Leaves Popping Through Soil
Once you see the first bit of green popping through the soil, it's incredibly fulfilling. You can rest assured that your plants are off to a great start!
So what comes next? When do you start feeding nutrients? Should you bring the light closer to your plant, now that there is foliage to absorb this energy and undergo photosynthesis? When should you start feeding nutrients?
You likely have lots of questions. Our indoor growing guide is the best place to start - it covers each and every step of the growing cycle indoors. However, we'll briefly cover the next steps below.
Ease Your Way Into The Vegetative Growth Stage
While you may see some small green leaves poking through your media, these are likely not true leaves yet.
The first set of leaves on a plant are different from the true leaves. You'll be able to see the difference soon. Watch for the striations in the leaves.
Once you see your first set of true leaves, you are on your way to veg. Once you have 3-4 sets of true leaves, you can turn off the fluorescent and start using your main grow light.
Around this point, you'll want to start feeding your plants nutrients. You definitely don't want to feed heavy at the start - you'll shock and potentially burn your young plants. Start with half strength and then work up from there.
Your plants are going to grow quickly over the coming weeks. Watch for roots to show through the bottom of your pot and prepare to transplant into a larger pot.
Why Do My Seedlings Look So Lanky & Weak?
If your seedlings appear elongated and spindly, it's very likely they are stretching - this usually means not enough light.
If you are attempting to start seeds on a windowsill without a proper amount of light, move the seeds outdoors or add a small T5 to help add some light.
If you are still experiencing this stretch with grow lighting, it's possible your lights are too far away - hence the plant stretching towards the light. Try bringing the light a bit closer to the seedlings. Be careful to avoid burning or stressing them - make small adjustments, monitor change, and adjust again if needed.
Final Thoughts On How To Germinate Seeds
Now you know everything you need to know about how to germinate seeds. All that's left to do now is put your knowledge to the test and germinate your own seeds!
One of the biggest takeaways you should gather from this is that you will probably not have a 100% germination rate. Plan in accordance with this.
If you want 5-10 plants, don't try and germinate just 5-10 seeds. Germinate more than you need, and discard what you don't need in the end. It's also worth starting all your seeds, flipping to flower to identify males/females, and then discarding the males.
A good start is crucial to a successful, heavy harvest. Put in the work now, and reap the benefits in a few months when you start pulling buds off your plant! Now that you know about starting from seed, learn about the rest of the growth cycle. Check out our complete guides on indoor growing or outdoor growing, depending on how you are planning on getting started.